

How to Install an Emergency Beacon for Cars (2026)
Table of Contents
- Why Your Car Needs a Properly Installed Emergency Beacon
- What You’ll Need Before Starting the Installation
- Magnetic vs Hard-Wired Emergency Lights: Which Fits Your Vehicle?
- Step-by-Step Emergency Beacon Installation for Cars
- How to Wire a 12V Beacon Safely to Your Electrical System
- Amber Flashing Beacon Regulations: Staying Legal on the Road
- DIY vs Professional Installation: Know the Risks
- Final Checks and Maintenance for Long-Term Reliability
- Frequently Asked Questions
Last Updated: September 9, 2026
Why Your Car Needs a Properly Installed Emergency Beacon
There is a wide gap between sticking a warning light on your dashboard and installing an emergency beacon for cars the right way. A poorly fitted unit can detach at speed, drain your battery, or fail exactly when you need it most after a breakdown on a motorway hard shoulder.
Mounting method and wiring quality determine whether a beacon actually protects you. The unit must stay fixed under vibration and wind load, and the electrical connection must be fused and secure. Many motorists assume that because a beacon is magnetic, the job ends there. It does not.
A beacon that is not properly secured becomes a projectile in a collision or at high speed. Worse, an unfused wire tapped into your electrical system can cause a short that disables your vehicle entirely. Never skip the fuse.
What You’ll Need Before Starting the Installation
Before you begin any emergency beacon installation for cars, gather the right tools and components. Installation takes 30 to 60 minutes for a hard-wired unit and under five minutes for a magnetic one. For a permanent fit, you will need a wiring harness with an inline fuse, a switched live source, a clean earth point, cable ties, and basic hand tools including a spanner set and trim removal tool.
For a temporary magnetic setup, you only need the beacon itself and a 12V socket adapter if your unit uses one. The UK Highway Code rules on breakdowns recommend that you leave your vehicle from the side furthest from traffic and stand behind a barrier, so consider how your beacon will help you deploy it quickly in that scenario. A unit that requires tools to activate is less useful in an emergency.
Magnetic vs Hard-Wired Emergency Lights: Which Fits Your Vehicle?
The choice between magnetic and hard-wired emergency lights comes down to how often you use the beacon and at what speeds. Magnetic bases suit occasional users who need to transfer the light between vehicles, but above roughly 50 mph, wind lift can overcome the magnetic hold, especially on curved or dirty roofs (ntsb.gov).
Hard-wired or bolt-mounted units are the standard for commercial fleets and response vehicles because they stay fixed regardless of speed. They also draw power from the vehicle’s electrical circuit rather than a socket, meaning no dangling cable and no risk of the adapter pulling loose. The trade-off is that installation is permanent and requires drilling or existing mounting points.
| Mount Type | Best For | Speed Suitability | Installation Effort |
|---|---|---|---|
| Magnetic base | Occasional use, multiple vehicles | Up to ~50 mph | Under 5 minutes |
| Bolt mount | Permanent fleet fit | All speeds | 30-60 minutes |
| DIN pole mount | Roof bars, HGVs | All speeds | 15-30 minutes |
If you drive a car with a panoramic glass roof, a magnetic base will not hold. In that case, a bolt or DIN pole mount is your only reliable option.
Step-by-Step Emergency Beacon Installation for Cars
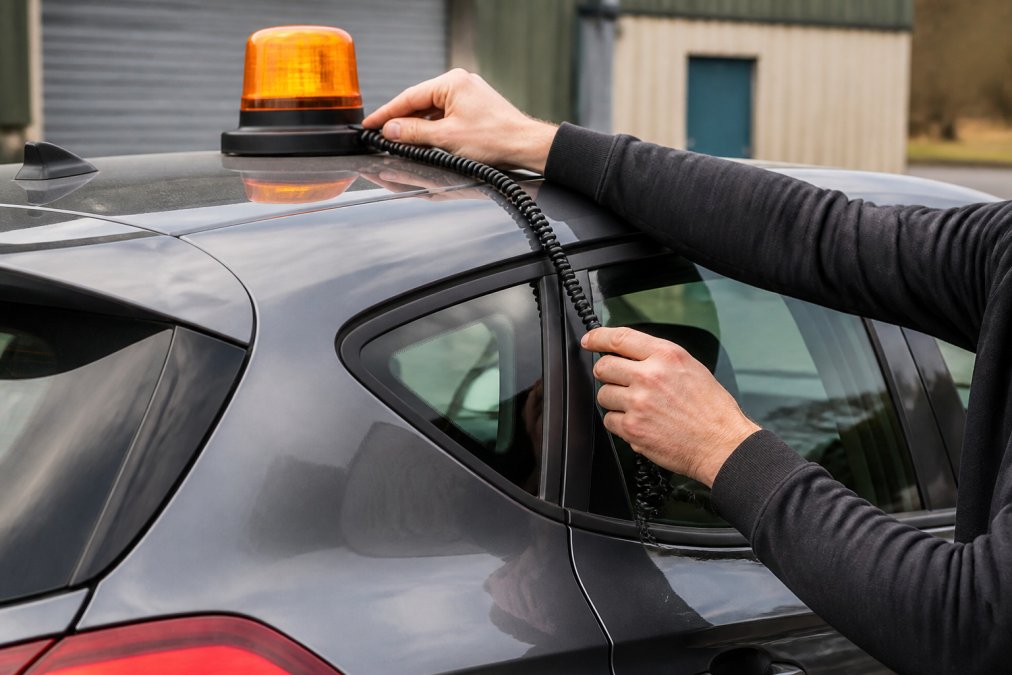
Step 1: Position the Beacon for Maximum Visibility
Place the beacon at the highest point of the vehicle, typically the centre of the roof, so approaching traffic sees it over the roofline. For a car, mounting it slightly forward of centre improves visibility to drivers in high-sided vehicles. Clean the surface thoroughly with an alcohol wipe so the magnetic base or adhesive makes full contact.
Step 2: Secure the Mounting Base
For magnetic units, test the hold by pulling firmly from several angles before trusting it. For bolt mounts, mark the drill points, check underneath for wiring looms or fuel lines, then drill and fit with the supplied gasket to keep water out. Apply a corrosion inhibitor to the bolt threads.
Step 3: Route the Cable Through the Door or Bulkhead
The cleanest route for most cars is through the rear door gap, following the existing wiring loom grommet. Feed the cable through the rubber boot, then run it along the headliner and down the A-pillar. Never route a cable through a window opening, as the glass will eventually pinch and cut the insulation. Secure the cable every 15 to 20 cm with cable ties to prevent chafing.
How to Wire a 12V Beacon Safely to Your Electrical System
Wiring a 12V beacon into your vehicle is straightforward if you respect the electrical system. The two rules are: use a fused connection and find a proper earth. Ignore either and you risk a fire or a flat battery.
Finding a Switched Live and a Clean Earth Point
A switched live is a power source that only energises when the ignition is on, which prevents the beacon from draining your battery if you forget to switch it off. Common points include the cigarette lighter socket wiring or the fuse box. Test each candidate with a multimeter to confirm it reads 12V with the ignition on and 0V with it off.
The earth connection is equally important. The negative electrode of the circuit must attach to a bare metal point on the chassis, not to a painted surface or an existing bolt that is already corroded. Scrape the paint back to bright metal, attach the ring terminal, and tighten securely.
Fused Connections and Cable Protection
Every permanent installation must include an inline fuse rated for the beacon’s draw, typically 5 to 10 amps, placed as close to the power source as possible. This protects the entire cable run between the battery and the beacon. Use a proper wiring harness rather than scotch-lock connectors, which can cut through the insulation of the original wire over time.
Run the positive cable through a grommet wherever it passes through metal. Bare wire rubbing against a sharp edge will eventually short against the chassis, and the fuse will not help if the short happens before the fuse in the circuit.
Amber Flashing Beacon Regulations: Staying Legal on the Road
Most installation guides stop at ‘use amber, not blue.’ That is not enough. The legal framework for warning beacons in the UK is a patchwork of the Road Vehicles Lighting Regulations 1989 (RVLR), the Highway Code, and specific codes of practice. The colour of your beacon determines its legal meaning, but the context of your use determines whether you are allowed to fit it at all.
The Colour Code: What Each Beacon Signifies
The RVLR sets out which colours are permitted and for whom. The table below summarises the key distinctions for road use in the UK:
| Beacon Colour | Legal Meaning | Typical Permitted Users | Private Motorist Use? |
|---|---|---|---|
| Amber | Hazard warning, slow-moving or stationary vehicle | Breakdown operators, recovery trucks, road maintenance, escort vehicles, agricultural vehicles | Permitted for warning of a temporary hazard (e.g., a broken-down car on the hard shoulder), but not for gaining priority or ‘right of way’ |
| Blue | Emergency response, priority over traffic | Police, fire, ambulance, some HM Coastguard and bomb disposal units | Illegal to fit or display on a private vehicle unless it is an authorised emergency vehicle |
| Green | Medical use (doctor on call) | GPs responding to emergencies, some medical personnel | Permitted only with specific authorisation from the DVLA or relevant health authority; not for general use |
| Red | Rear-facing warning to indicate a stationary hazard | Rear of road maintenance vehicles, some recovery vehicles | Generally not permitted on the front of a moving vehicle; red rear lights are for standard vehicle lighting |
The Critical Distinction: Hazard Warning vs. Priority
The most common legal error is assuming an amber beacon grants any kind of priority. It does not. Under the RVLR, an amber beacon is a warning light, not a request for right of way (legislation.gov.uk). If you fit an amber beacon to a private car and drive with it flashing, you are not exempt from speed limits, traffic signals, or normal rules of the road. The Highway Code (Rule 225) advises that you should only use hazard warning lights when your vehicle is stationary and causing a temporary obstruction. Using an amber beacon to move through traffic faster is an offence under the Road Traffic Act 1988.
The ECE R65 Standard: Not Optional for New Fits
If you are installing a new beacon, it must comply with UNECE Regulation 65 (ECE R65), which governs the photometric performance of warning lamps. This standard sets minimum and maximum luminous intensity, flash frequency, and beam spread. A beacon that is not ECE R65-approved may be bright, but it is not type-approved for road use in the UK. In practice, the unit should carry an ‘E’ mark (e.g., E1 for Germany, E11 for the UK) followed by the approval number. Fitting a non-compliant beacon can result in a vehicle defect notice and a fine of up to £1,000 per vehicle.
The Regional Compliance Matrix: Beyond the UK
If you drive a UK-registered vehicle into Europe, the legal picture changes. The UK’s exit from the EU means UK type approvals are not automatically recognised in EU member states for new equipment. For temporary visits, most EU countries accept UK-approved beacons for transit, but for prolonged use or commercial operations, you must check local rules.
- Spain (DGT 3.0): Since 2021, Spain requires V-16 emergency beacons for breakdowns on motorways. These are not roof-mounted strobes; they are autonomous, geolocated devices placed on the road. A traditional amber roof beacon does not satisfy the Spanish V-16 requirement. If you drive in Spain, you need both a UK-compliant amber beacon for your vehicle and a V-16 device for roadside emergencies.
- France: Amber beacons are permitted for breakdown and recovery vehicles. Private motorists may use them only when the vehicle is stationary and causing a hazard. French law requires a warning triangle, not a beacon, for stopped vehicles.
- Germany: Amber beacons are allowed for vehicles with a ‘Warnleuchte’ permit, typically for road maintenance or abnormal loads. Private use on a standard car is not permitted unless the vehicle is officially classified as a hazard vehicle.
The Practical Takeaway for UK Drivers
For a private motorist in the UK, the safest legal configuration is an amber beacon that meets ECE R65, fitted to a stationary vehicle warning of a hazard. Do not use it while moving. Do not fit a blue beacon. And if you travel to Spain, carry a V-16 device as well. The law is about what the light communicates to other road users and whether you have the legal authority to send that signal.
Fitting a blue beacon to a private car is a criminal offence under the RVLR, carrying fines and potential penalty points. There is no ’emergency’ exemption for private motorists. Only authorised emergency vehicles may display blue lights.
For commercial operators, the relevant code of practice is the Department for Transport’s ‘Code of Practice for the Use of Warning Beacons and Audible Warning Equipment’ which outlines specific requirements for vehicle livery, beacon placement, and operational protocols. A breakdown truck operating under this code must have its beacon visible from 360 degrees and mounted at a minimum height. A private car with a magnetic beacon does not meet these commercial standards, even if the beacon itself is ECE R65-approved.
DIY vs Professional Installation: Know the Risks
The decision between DIY and professional installation is not about skill with a spanner. It is about understanding the electrical architecture of a modern vehicle. A 2015 or newer car is not a simple 12V circuit; it is a network of controllers communicating over a Controller Area Network (CAN-bus). Adding an aftermarket load without understanding this network can cause failures that range from a dashboard warning light to a vehicle that will not start.
The CAN-Bus Problem: Why Modern Cars Are Different
CAN-bus is a multiplexed wiring system where multiple electronic control units (ECUs) share data over a two-wire bus. When you tap into a circuit for power, you are not just drawing current; you are introducing electrical noise and changing the impedance of that circuit. The vehicle’s body control module (BCM) monitors current draw on each circuit to detect faults. If your beacon draws more current than the BCM expects, or if the wiring introduces resistance, the BCM may log a fault code and disable that circuit.
Common fault codes triggered by poorly installed beacons include:
- P0685 (ECM/PCM power relay control circuit) – often triggered by a short on a switched live
- U0100 (Lost communication with ECM) – caused by electrical noise on the CAN-bus lines
- B1320 (Battery voltage low) – from a beacon that drains the battery when the ignition is off
These codes do not just light up the check-engine lamp; they can put the vehicle into ‘limp mode’ or disable the start-stop system. The fix is not always as simple as removing the beacon. The BCM may need a dealer-level diagnostic tool to clear the fault and reset the learned parameters.
The Warranty Void Trap
Under the Consumer Rights Act 2015, a manufacturer cannot void your entire vehicle warranty for an aftermarket modification. However, they can refuse a warranty claim on a specific component if they can demonstrate your modification caused the failure. If your beacon wiring shorts out the BCM, the manufacturer can refuse to cover the BCM replacement. The burden of proof is on the manufacturer, but in practice, a dealer will photograph the aftermarket wiring and document the modification. If the wiring is not fused, not earthed to bare metal, or uses scotch-lock connectors, the claim is likely to be rejected.
When DIY Is Genuinely Safe
DIY installation is appropriate when all of the following are true:
- The vehicle is older than approximately 10 years and does not rely heavily on CAN-bus for body functions.
- You are fitting a magnetic beacon that plugs into a 12V socket, not a hard-wired unit.
- You are confident using a multimeter to verify a switched live and a clean earth.
- The beacon draws less than 5 amps and has its own inline fuse.
For a magnetic beacon on a 2012 Ford Focus, DIY is straightforward. For a 2024 Tesla Model 3 or a 2023 Range Rover, DIY is a high-risk activity that can void the electrical warranty and create intermittent faults that are expensive to diagnose.
The Professional Installation Standard
A professional auto-electrician does not just connect wires. They use a ‘pulse width modulation’ (PWM) compatible driver where needed, they tap into the correct fuse position using a ‘add-a-circuit’ fuse tap rather than scotch-locks, and they route cables through factory grommets to maintain IP ratings. They also test the installation with a diagnostic scanner to confirm no fault codes are logged before handing the vehicle back.
Professional installation typically costs between £150 and £400 for a hard-wired beacon, depending on the vehicle and the complexity of the routing. That cost includes the labour, the correct fuse tap, and the diagnostic check. For a commercial vehicle that must pass an operator’s licence inspection, professional installation is not optional; it is a requirement of the DVSA’s maintenance standards.
The Diagnostic Test You Can Do Yourself
Before you decide on DIY, run this simple test. With the engine off, measure the voltage across the battery terminals. It should read approximately 12.6V. Now switch on the beacon for 30 seconds and measure again. If the voltage drops below 12.2V, your beacon is drawing too much current or your battery is weak. Then, with the engine running, measure the voltage at the beacon’s power input. It should read between 13.8V and 14.4V (alternator output). If it reads less than 13V, your wiring is introducing resistance, and the beacon will underperform.
If your vehicle logs a CAN-bus fault after installation, do not simply clear the code and ignore it. The fault may indicate a wiring issue that will recur and could affect safety systems. Disconnect the beacon and have the vehicle scanned by a professional before continuing.
The Bottom Line
DIY is not about saving money; it is about matching your skill level to the vehicle’s complexity. For a modern vehicle with CAN-bus, the £200 you save on professional installation can easily become a £1,200 BCM replacement bill. For a commercial vehicle, the legal liability of a non-compliant installation far outweighs the cost of a professional fit. When in doubt, the professional is the safer choice.
Final Checks and Maintenance for Long-Term Reliability
Once the emergency beacon installation for cars is complete, run through a final checklist before trusting it. Test the beacon with the engine running and with it off to confirm the switched live behaves correctly. Check that the flash patterns cycle properly and that the unit is visible from all required angles. Then go for a short drive and listen for cable rattles or wind noise around the mounting point.
Maintenance is minimal but important. Magnetic bases collect metal filings and grit over time, which reduces holding power, so wipe the base clean monthly. Inspect the cable for chafing where it passes through door gaps or the bulkhead, and check the mounting bolts for corrosion twice a year. LED strobe units have a long service life, but the seals around the lens can degrade, so inspect the IP rating integrity by checking for condensation inside the housing.
The difference between a beacon that saves lives and one that fails is installation quality. Secure the mount, fuse the positive line, earth to bare metal, and verify the legal colour for your use case.
Frequently Asked Questions
Can I legally install an amber flashing beacon on my private car?
Yes, but it depends on how you use it. Amber beacons are legal on private vehicles in the UK when used to warn other road users of a hazard, such as a breakdown or slow-moving vehicle. However, you cannot use them to claim priority over traffic or on a public road for non-warning purposes. Blue or red lights are reserved for emergency services. Always check the specific rules that apply to your vehicle type and use case.
What is the difference between a magnetic and a hard-wired emergency beacon?
A magnetic beacon sits on the roof and plugs into your 12V socket, making it portable and removable. A hard-wired beacon is bolted to the vehicle and connected directly to the electrical system, often through a switch. Magnetic units suit drivers who need occasional warning lights. Hard-wired options offer a cleaner finish, a fixed fuse, and no dangling cables, making them better for commercial fleets or frequent users.
Do I need professional help to install a hard-wired emergency beacon?
If you are confident working with 12V vehicle electrics, you can do it yourself. You will need to find a switched live circuit and make a secure, fused connection. However, getting it wrong can damage your vehicle’s electrical system or cause the beacon to fail when you need it. If in doubt, an auto electrician can complete the job safely and verify the wiring is protected.
What are the visibility requirements for vehicle warning lights in the UK?
Warning beacons sold for road use should meet ECE R65, the standard for approval of warning lamps. This ensures the light output and flash rate are sufficient to alert other drivers. For stationary vehicles on motorways, a high-visibility beacon with a 360-degree pattern is essential. The beacon should be mounted high enough to be seen over other traffic, typically on the roof line.
Fitting an emergency beacon correctly is the difference between genuine protection and a false sense of security. Roadflash builds early warning systems with GPS and geolocation features that help responders find you quickly, and our units are engineered for straightforward installation on modern vehicles. Get started with Roadflash and make sure your next breakdown is seen long before it becomes a collision.